Showing posts with label Halloween. Show all posts

Easy Peasy Halloween Blocks and Where to buy cheap Vinyl

halloween block
Aren’t these adorable?!
It’s an easy inexpensive way to add Halloween décor
to your home that even the kids can do!
halloween block1
What you need to make these adorable blocks:
  • 2x4 or 2x6 wood 
  •  paint 
  •  vinyl 
  •  transfer paper 
  •  poly 
  • cutting machine
  homedepot
For my wood blocks I usually use scrape wood leftover from other projects OR I hit the Home Depot
and check their Bargain Lumber bin.
If you’re lucky it will be filled with 2x4’s and 2x6’s!
Check out another  project I did using Bargain Lumber: HERE

photo 1(14)
I just took my .51cent 2x6 and cut into 6 inch blocks.
Home Depot’s customer service is
awesome and if they aren’t busy and you sweet talk them most always they will cut your board for youSmile
Then paint the blocks. I painted all these black and added white vinyl.
The BEST cheapest place to order vinyl is H&H Sign Supply

halloween block
{the 2x4’s I cut into 3”,6” & 7”}
I used my Silhouette to cut my vinyl. H&H Sign Supply even has a pretty good discount if you haven’t invested in this awesome machine.
All these designs can be purchased in the Silhouette store for .99 cents each.

After you cut your image you transfer the image onto the block with transfer tape. You could also use clear contact paper or Glad’s press and seal.
When I’m out of transfer tape {which works the best} I just the other 2 methods.

Then I seal the whole block with a coat of poly.
photo 4(11)
The possibilities are endless on all the Halloween décor you can make!
halloween block
Stay clear of those TOXIC TREATS! Everyone have a very safe and
 HAPPY HALLOWEENSmile


Thank you so much for stopping by!
Please check out all the places I party!

How to make a Chicken Costume!

The CUTEST little Chicken ever!!! 

This costume cost about $15 and took half a day to make......
  All you need:
Old Hoodie
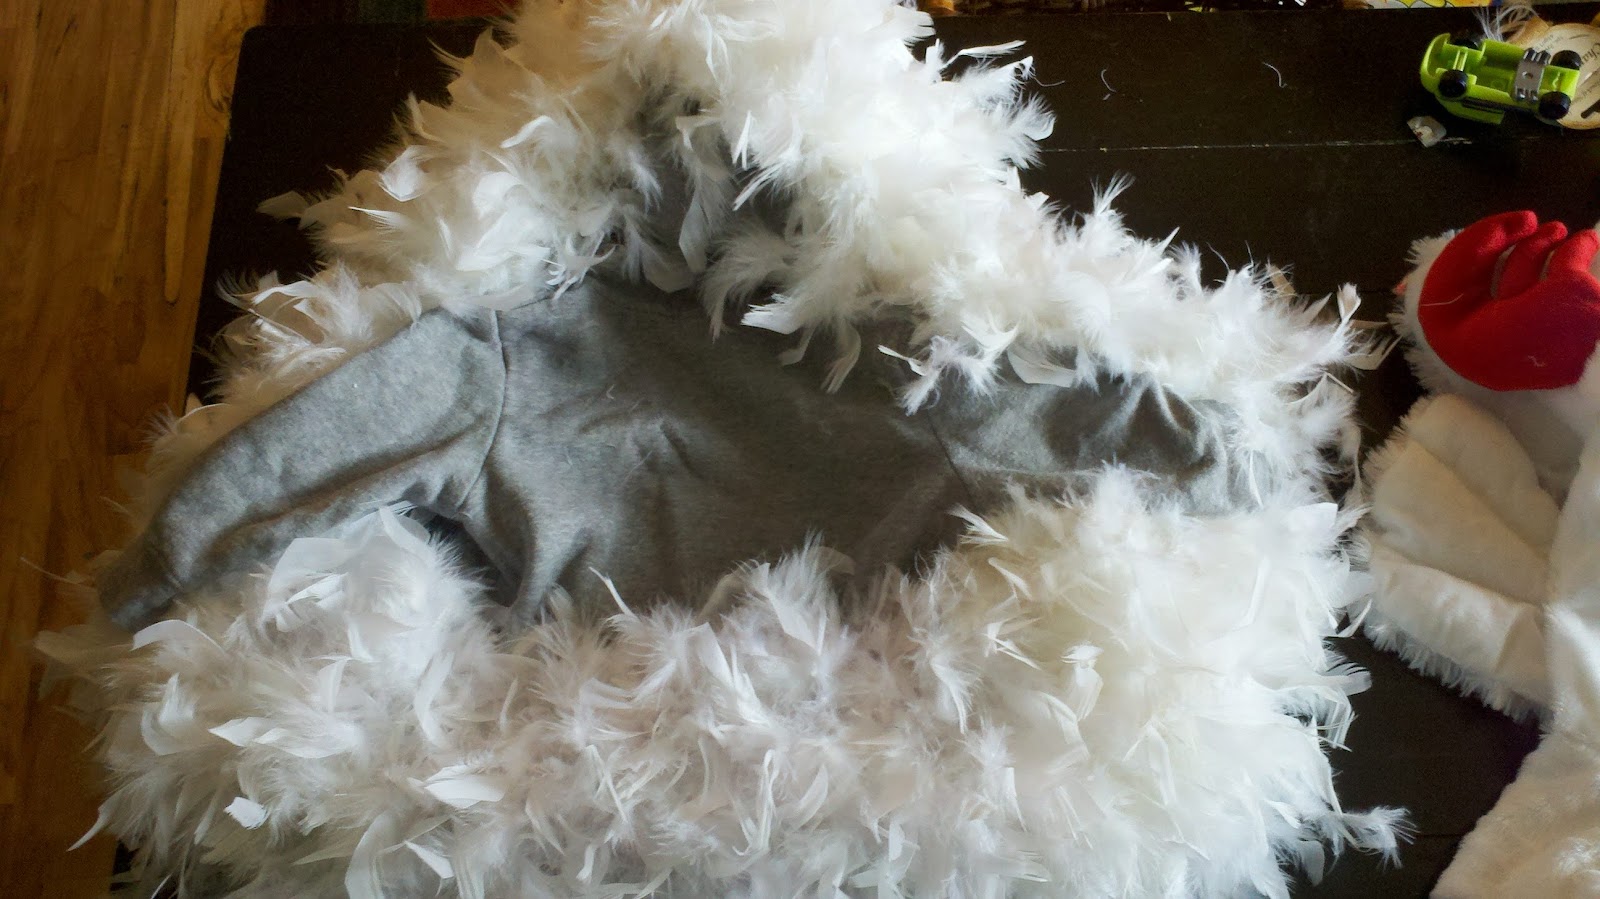
 4 Feather Boa's
 2 Rubber Gloves
Yellow tights
Chicken Head 
Last year I found a dog chicken costume at a thrift store for $1! First I cut the head, wings and tail from the dog costume and
stitched them on the hoodie......
I think the costume would be cute without the chicken head OR
you could use felt to make a head or tail:=) 
I suppose you could glue the feathers
but I hand stitched the boa's on the hoodie
You can find  feather boa's at dollar stores, Wal-mart toy department
or any craft store....
{I bought 4 from Hobby Lobby 1/2 price in their Christmas section }

I purchased yellow rubber cleaning gloves at Wal-mart  2 for $1
Stuff the fingers with some polyfil or cotton.
Insert shoe palm side down and pull tight so fingers arch up to provide tripping
Cut a slit from the tongue to heel 
Then fold and hot glue the glove closed
Perfect little chicken legs and feet!! 
I glued some loose feathers around the glove opening..... 
Can't find yellow tights?? Try dying white tights with Rit's yellow dye!


Have a Happy Halloween Everyone!! 
Check out all the places I party!

Holy COW! Let's make a Halloween Costume!


 Sharing an edited post from last year:

 My little Cow!
This is my son Rains last year at 14 months old....
and he was the cutest cow I've ever seen~!

I had soooo much FUN making this little costume for him...
Here's what I used:
1 1/2 yards of white fur
black fabric paint
pink and white felt
ribbon
cow bell
pattern

Sure....I could have spend $10 at Wal-mart and bought a cow costume...
but what FUN is that....
Nothing beats the fun of  Handmade!
I couldn't find any cow print that I liked...so I painted my own!
Plus it's cold here and I needed fabric that would keep my boy warm
on his search for CANDY!
I cut out my pattern pieces after the paint dried.
I only used the lamb pattern pieces.
I don't have a sewing machine so I just whip stitched everything together.
Fur is very forgiving and I didn't have to hem or fuss to much with the little details of the pattern.
Add a cow bell on some ribbon......
2 white felt horns and a braided yarn cow tail....
and you get the cutest COW ever!

Check out all the places I party!

Jack Skellington Hat Tutorial

As seen on Caron Connections!

My little Rains I mean my Jack Skellington Hat
was Featured in Caron Connections!
WOW!! Check it out!^^^^^^^^^^^
So......I guess I NEED to write up a tutorial on 
HOW to make this CUTE hat.....

Just a little side note.....I am just a basic crocheter....
I can barely read a pattern. I know a few stitches and 
I have no clue about gauges even though nice ladies in the 
craft stores have tried to explain them to me many times! LOL
 BUT 
I don't let that stop me from being creative.
I know you too can make these hats and 
for the more advanced crocheter PLEASE bare with me 
on my pattern writing abilities:)

You can see all the wonderful colors and 
styles of yarn and other FREE patterns at 

MATERIALS:
Worsted Weight Yarn 
Caron Simply Soft
Black and White
Size I (5.5 mm) crochet hook 
A yarn needle 

I made 2 versions of this hat....
One in Black 
and one in White


Use your favorite beanie hat pattern 

Or 

This one:

I recently learned how to start each hat with a Magic Circle...this allows you to make your starting hole as tight as possible....you can learn this too.....HERE

This pattern is for sizes: 
Newborn: 16 inch & Toddler: 18 inch

Round 1 Make a Magic Circle or Ch 3 12 dc in 3rd chain from hook. Join with slipstitch in top of first dc [12 dc]
Round 2 Ch 2, 2 dc in each dc around. Join with slipstitch in top of first dc. [24 dc]
Round 3 Ch 2, *dc in next st, 2 dc in next st. Repeat from * around. Join with slipstitch in top of first dc. [36 dc]
Round 4 Ch 2, *dc in next 2 sts, 2 dc in next st. Repeat from * around. Join with slipstitch in top of first dc. [48 dc]
For 16 inch hat, skip to Round 7.
Round 5 Ch 2, *dc in 7 dc, 2 dc in next dc. Repeat from * around. Join with slipstitch in top of first dc. [54 dc]
Round 6 Ch 2, dc in each dc around. Join with slipstitch in top of first dc [54 dc]
Round 7-12 Ch 2, dc in each dc around. Join with slipstitch in top of first dc.
 Round 13 you can do a sc in each stitch around 
OR 
You can use a front/back dc post stitch 
for a nice ribbed finished look and fitted feel.
Trust me the front/back post is easier than it sounds.
 With a front or back post stitch, instead of inserting your hook through the top of the dc to pull up a loop, you insert it around the post of the stitch, either in front or back of the work. I watched to few YouTube 
video's to get a better understanding
 Round 13 Ch 3, dc around the front side of a post then dc around the back side of a post all the way around. Fasten off
See the nice finish with a front/back post!

Make 2 Eyes: 
Round 1: Ch 2, 3 sc in 2nd Ch from hk. 
DO NOT JOIN. 
Work in one continual round.
Round 2: 2 sc in ea sc around. (6 sc)
 Round 3: 2 sc in ea sc around. (12 sc)
Stop here for the newborn size
Round 4: 2 sc in ea sc around (24 sc)

 For the Black hat 
Make a white face
Make a Magic Circle or Ch 3 12 dc in 3rd chain from hook. Join with slipstitch in top of first dc 
Then Ch 2, 2 dc in each dc around
continue around to the desired size
(about 4 to 5 rounds)
I whipped stitched the face on the hat after
I attached eyes and made nostrils and mouth.
With black, stitch eyes to face
 Nostrils and Mouth
Use yarn needle
Thread needle with about 2 ft of Black yarn
or enough to stitch 2 nostrils and a mouth.
Have FUN with the mouth....
it can be scary or smiley 
Most stitches are slanted in different directions.


I hope you enjoy your hat as much as we do!

~Please check my sidebar for all the wonderful places I link up and MORE great ideas.~


A Halloween Costume Contest!

Moo!!!

Have you been looking for a Halloween Costume Contest
for your little one???

I have found a few that I want to share:


Check ALL the Cuteness on their Facebook page
OR
 Send your pictures - reviews@ergobaby.com - of your costumes, and they will choose a favorite to win an ERGObaby Carrier! Winner selected November 1.


  Send your photo to: PROMOTIONS@PRINCELIONHEART.COM
OR
Stop by and LIKE my little Cow (PLEASE)
The Cow I mean the costume with the most LIKES will
WIN a wheelyBUG!


Stop by and check all the years past great costumes then
Scroll down to the bottom of the page to enter....
You will receive an e-mail...then you send in your photo

$125 ~1st place Grand Prize winner 
$100~ 2nd place
$75~ 3rd place prize 
. $50~4th Place and 5th Place 
In addition, each category of costumes in the contest (baby, children's, pet, scariest, couples, group, etc) will be awarded a prize. This year's best-of-category prizes will be $35 each. Category "runner up" prizes will be $25 each.

The 2010 Family-Vacation-Getaways.com Halloween Costume Contest winners will be decided by a panel of judges.


Ok....that's all for now...I'm still on the hunt! I LOVE Halloween! I actually made my son a Cow, Chicken, Train Conductor and Super Grover...Yes I know a little overboard!!
But this stage of cuteness is gone tooo quick and I'm taking FULL advantage!
I have only been entering the COW!!


Good Luck Everyone and Happy Halloween:)


Photobucket

A Cow Costume

My little Cow!
This is my son Rains...he is 14 months old....
and he is the cutest cow I've ever seen~!


I had soooo much FUN making this little costume for him...
Here's what I used:
1 1/2 yards of white fur
black fabric paint
pink and white felt
ribbon
cow bell
pattern

Sure....I could have spend $10 at Wal-mart and bought a cow costume...but what FUN is that....
Nothing beats Handmade!
I just couldn't find any cow print that I liked...so I painted my own!
Plus it's cold here and I needed fabric that would keep my boy warm on his search for CANDY!
I cut out my pattern pieces after the painted dried.
I only used the 2 body pieces, 2 sleeves and 3 hood pieces.
I don't have a sewing machine so I just whipped stitched everything together on our 6 hour road trip to Denver.
Fur is very forgiving and I didn't have to hem or fussed to much with the little details of the pattern.
Add a cow bell on some ribbon......
2 white felt horns and a braided yarn cow tail....
and you get the cutest COW ever!

Photobucket
~Please check my sidebar for all the wonderful places I link up and MORE great ideas.~

You May Also Like:

Related Posts with Thumbnails
Blogging tips