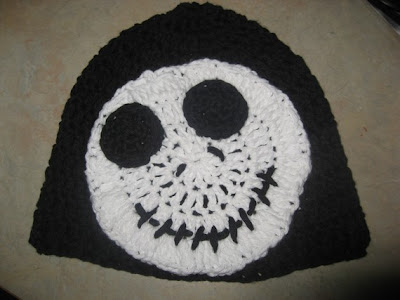
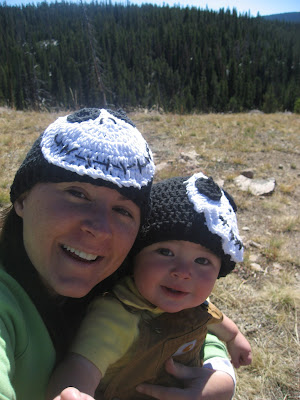
As seen on Caron Connections!
My little Rains I mean my Jack Skellington Hat
was Featured in Caron Connections!
WOW!! Check it out!^^^^^^^^^^^
So......I guess I NEED to write up a tutorial on
HOW to make this CUTE hat.....
Just a little side note.....I am just a basic crocheter....
I can barely read a pattern. I know a few stitches and
I have no clue about gauges even though nice ladies in the
craft stores have tried to explain them to me many times! LOL
BUT
I don't let that stop me from being creative.
I know you too can make these hats and
for the more advanced crocheter PLEASE bare with me
on my pattern writing abilities:)
You can see all the wonderful colors and
styles of yarn and other FREE patterns at
MATERIALS:
Worsted Weight Yarn
Caron Simply Soft
Black and White
Size I (5.5 mm) crochet hook
A yarn needle
I made 2 versions of this hat....
One in Black
and one in White
Use your favorite beanie hat pattern
Or
This one:
I recently learned how to start each hat with a Magic Circle...this allows you to make your starting hole as tight as possible....you can learn this too.....HERE
Newborn: 16 inch & Toddler: 18 inch
Round 1 Make a Magic Circle or Ch 3 12 dc in 3rd chain from hook. Join with slipstitch in top of first dc [12 dc]
Round 2 Ch 2, 2 dc in each dc around. Join with slipstitch in top of first dc. [24 dc]
Round 3 Ch 2, *dc in next st, 2 dc in next st. Repeat from * around. Join with slipstitch in top of first dc. [36 dc]
Round 4 Ch 2, *dc in next 2 sts, 2 dc in next st. Repeat from * around. Join with slipstitch in top of first dc. [48 dc]
For 16 inch hat, skip to Round 7.
Round 5 Ch 2, *dc in 7 dc, 2 dc in next dc. Repeat from * around. Join with slipstitch in top of first dc. [54 dc]
Round 6 Ch 2, dc in each dc around. Join with slipstitch in top of first dc [54 dc]
Round 7-12 Ch 2, dc in each dc around. Join with slipstitch in top of first dc.
Round 13 you can do a sc in each stitch around
OR
You can use a front/back dc post stitch
for a nice ribbed finished look and fitted feel.
Trust me the front/back post is easier than it sounds.
With a front or back post stitch, instead of inserting your hook through the top of the dc to pull up a loop, you insert it around the post of the stitch, either in front or back of the work. I watched to few YouTube
video's to get a better understanding
Round 13 Ch 3, dc around the front side of a post then dc around the back side of a post all the way around. Fasten offSee the nice finish with a front/back post!
Make 2 Eyes:
Round 1: Ch 2, 3 sc in 2nd Ch from hk.
DO NOT JOIN.
Work in one continual round.
Round 2: 2 sc in ea sc around. (6 sc)
Round 3: 2 sc in ea sc around. (12 sc)
Round 2: 2 sc in ea sc around. (6 sc)
Round 3: 2 sc in ea sc around. (12 sc)
Stop here for the newborn size
Round 4: 2 sc in ea sc around (24 sc)
For the Black hat
Make a white face
Make a Magic Circle or Ch 3 12 dc in 3rd chain from hook. Join with slipstitch in top of first dc
Then Ch 2, 2 dc in each dc around
continue around to the desired size
(about 4 to 5 rounds)
I whipped stitched the face on the hat after
I attached eyes and made nostrils and mouth.
With black, stitch eyes to face
Nostrils and Mouth
Use yarn needle
Thread needle with about 2 ft of Black yarn
or enough to stitch 2 nostrils and a mouth.
Have FUN with the mouth....
it can be scary or smiley
Most stitches are slanted in different directions.
I hope you enjoy your hat as much as we do!
~Please check my sidebar for all the wonderful places I link up and MORE great ideas.~


16 comments:
Congrats! How fun.
That little cutie at the top is an excellent model...
you are uber talented! Soooo cute!
The hats are so cute! What a great Halloween accessory.
OMG!I'll take one of those hats, but only if that cute little kid comes with it!!
what a cute hat ! even though I don't know how to knit . I'm sure you could make those on slippers too . I love knitted slippers .
Scary! Hi, I gave you an One Lovely Blog Award. Do come to my blog to take the Award Button.
Super cute! Good job : )
OMG how cute! I used to crochet but it has been a very long time.
Love them!!
I'd love if you linked this to my Fibers on Friday party. A linky party dedicated to knitters and crocheters!
http://plumslife.blogspot.com/
This is totally adorable. I've never seen anything like this before.
Congratulations on your feature...although I have to say I'm not surprised. This is really different and fun!
Thanks for sharing it with us, too, today on Alphabe-Thursday!
Really neat!
A+
love it! so cute!
www.thecapeonthecorner.blogspot.com
Oh Jack! Too bad yo can't sell those at Disneyland...you could retire!
I love this! Am a big NBC fan so this is right up my alley :)
You are talented and that looks like a nice hat
These are too cute!! I really want to learn how to crochet and sew!!
I also wanted to give you the Stylish Blog Award...
Stylish Blogger Award
Rules for accepting this award are:
1. Thank & link back to the person who awarded you this.
2. Share 7 things about yourself.
3. Pay it forward to 15 recently discovered great bloggers.
4. Contact those bloggers and tell them about their Blog Award!
You can get the award off of my post, just save it as a pic ; )
Hope you have a great Thanksgiving!
~Melissa
http://mnmrheinlander.blogspot.com
This is cute! Sending some love from Family and Life in Las Vegas!
Post a Comment