Let's Make A Father's Day Gift!!

Isn't this the CUTEST gift for DAD?!
A photo of dad and son inside a hollowed out light bulb on a chalkboard block!!! 
Perfect to write how much you LOVE your dad!
Another option is to make a wire heart and screw a socket to the block.
There are so many wonderful FUN colors of wire! 
Aren't they just so COOL! 
I got the idea HERE

Let's make one! 

What you need:
  • Pliers
  • Light Bulb
  • Wire
  • Wood Block
  • Chalkboard Paint
  • Mini Clothes Pin/Socket
First I cut few blocks from left over lumber and sanded the edges.
One is cut from a 4x4 and the other with the socket is from a 2x6. 
{I cut a few extra to add to my Etsy shop and for my Farmers Market booth}
Then painted my block with a couple of coats of chalkboard paint. You can also make your own chalkboard paint in fun colors just by adding non-sanded grout to any flat paint. Like I did for my Art Activity Wall
While the paint dries...Hollow out the light bulb...This is surprisingly easy! 
I found a great tutorial HERE
I used an old burnt out light bulb and some small pliers.
I worked over a towel and just twisted and turned til the insides all came out...
who knew how easy it was to hollow out a light bulb?! 
Simply wash out the bulb with soap and water...
you don't even need to scrub..... it rises out so clean!
I thought I would try my hand at wire writing and put the word D A D in the light bulb! After watching a few You Tube video's on wire writing...
I had a total project FAIL!!!
Not only does it look AWFUL but it's way to big to go inside a light bulb...
Maybe you will be better at wire writing than me....
So I just went with a simple heart...
I did have to bend the heart a little to insert it and then put 2 screwdrivers up the bulb to carefully flatten out each side of the heart.
Then I hot glued the wire to the inside of the bulb so it stands upright. 
{if NOT using a socket, make a hole with a nail, insert wire and hot glue wire and bulb to block}
I found this old socket in one of the hubby's toolboxes 
and screwed it to the painted 2x6 block.
{Is it wrong to make the hubby a Father's Day Gift with items you 'steal' from his garage}
 and....the hubby already has this on his office desk! 


I had so much fun making this that I have been searching for items small enough to fit up a light bulb...While you can use a larger light bulb the opening is still the same size...

I found some tiny clothes pins at the craft store and glued them on the end of the wire and added a photo.
Oh the possibles are endless to be creative with a light bulb...search light bulb on Pinterest and you will see terrariums to fish bowls to potted plants!  


I think a set of 4 light bulbs on a longer board with the letters L.O.V.E would look awesome too....

What will you put up your light bulb?
Dried Flowers, Letters, Numbers, A LOVE Note Clay Shapes???

This post sponsored By:


Check out all the places I party!


Memorial Day SALE!

I hope everyone is having a wonderful 
Memorial Day!!
It's cold and rainy here in Wyoming...
so I spent the weekend updating my Etsy shop.....
Today ONLY enjoy a 15% off discount with 
CODE: Memorial
(enter code at checkout expires midnight 5/30)

Xylophone Wall Art

As  a Season 1 winner of American Crafters one of the prizes was 
this Vintage Toy Xylophone from Oopsee Daisies!

This toy will be going in my son's room in a music area I have planned 
{I've yet to start my son's room}
I decided to make some  matching wall art for this area using the leftover shims from my sunburst mirror.
 I marked a shim using the xylophone as my guide.
 The hubby FINALLY showed me how to use his saw and I proudly make ALL the cuts by myself!! I stacked 2 shims and made two sets.
 We had a few leftover cedar fence slats and I cut one using the toy as a guide.
 I had all the perfect colors in my craft paint stash!
 Oh I LOVE all the bright  fun COLORS!
 I used some small nails and just hammered til the 2 boards where connected....
this gives more of the xylophone look plus the 
shims will split if you hammer to far without pre drilling.
To hang my art...I used a hammer and nail to make a hole...
then pulled my bailing wire thru the back.....
I wrapped it around the end of my pliers..
 and pressed it to my board.....
 then in some areas of the wire I wrapped it around a pen to give it that cute swirly look....
Oh isn't it A.D.O.R.A.B.L.E. !! 

I think this would be the perfect gift for a music teacher and I have added it to my Etsy Shop

This post sponsored By:


Check out all the places I party!

10 FREE things to do in Sheridan, Wyoming


Yesterday I was over on C.R.A.F.T. sharing 10 FREE things to do in my town....
in case you missed it.....here is my town:

I live in Sheridan, Wyoming. 
My town has a population of 17,401 and was voted 
The #1 Western Town in America!

 I'm excited to share with you my part of the world.......
It's so beautiful here!
Drive through our town and you might just spot a moose, pheasant, and wild turkeys just to name a few....

In a small town you have to be creative to find FREE things to do..... 
Here are my top 10 favorite FREE things to do in my area:

1. Hiking
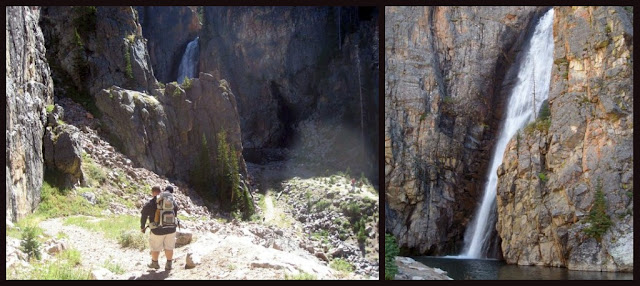
You can drive a few miles in any direction and find fabulous hiking spots! 
Hiking down to Porcupine Falls is our Favorite!

2. The Town Fountain
Oh this fountain has provided us with many hours of FUN! 
The BEST part is that our award winning website Sheridan Media has a web cam so his Nana 2 hours away can watch all the action! 
Oh and the beauty when they don't shut the fountain off before the first freeze.

3. Yellowstone Park 
There are 17 days in 2011 that have FREE admission to Yellowstone Park
We are a 250 mile drive to the East Entrance of the park. It's a great adventure to pack a picnic, some sleeping bags, a tent and head out on a beautiful drive to the park and sleep among the bears. 

4. Pan for GOLD!

The gold rush ain't over folks!!
Yes that's right I found GOLD! 
It is quite the thrill to spot a flake of gold! 
At $1000 an ounce, a flake has got to net about $1 or 2...right?
Just need a river and a pan and you got a very fun free activity that just might net you some riches!

 5. River Walk
We have a wonderful scenic river walk through our town......Stopping and throwing a few rocks in the river is my son's FAVORITE thing to do.
  
6. Visit a Park
Have you visited a park lately?
Watching everyone play, run, skip and jump is such a joy. We have many beautiful parks in our town even one with an ice cream stand and only $1 for a cone! You could probably find that under the swings making your ice cream FREE!
I don't think I've ever visited a park I didn't like! 

7.Fall Pumpkin Patch
Right now the fields are being prepared to plant pumpkin seeds! 
So come September and October we can visit the Pumpkin Patch  and enjoy FREE hayrides, cider, cookies and romps through the pumpkin patch. 
Oh and you can pet (or get eaten by) the farm animals....
We visit every weekend in the fall! 

8. Build a Snowman, Sled or Ski
Here in Wyoming we get SNOW! Lots and lots of SNOW!
In fact we just had snow last week and it's MAY!! 
I grew up in Texas and even in my 40's I still admire and LOVE the snow...  
In winter you can build a snowman, take a ride in a sled or ski!

9. Trail End State Historic Manson

The Trail End State Historic Site in Sheridan has an elegant aspect of Wyoming's history. 

The 13,748 square foot mansion has free days and free admission always for kids and it's just really neat inside.


10. Historic Main Street
Explore the historic downtown via the town trolley or walk and experience all the unique specialty, western and art shops and the over 46 buildings listed on the National Register. 

Find more info about Sheridan, Wyoming HERE 
 
I enjoyed sharing my TOWN! 

You can also share your town or city and link up your post on May 31st....
So stop by C.R.A.F.T  and join the FUN!

Creating Really Awesome FREE Trips

I'm over at C.R.A.F.T today taking part in Jamie's
Creating Really Awesome Free Trips Travel Series! 

I'm sharing my top 10 Favorite things to do in Sheridan, Wyoming....

You can also share your town or city and link up your post on May 31st....
So stop by C.R.A.F.T  and join the FUN!

I Survived the Rapture!!!

 Oh I just couldn't resist!! 
But if I was wrong...at least we all arrive naked so I wouldn't have egg on my face entering the gates of heaven wearing this shirt!
Well I'm not fortunate enough yet to own a Silhouette....
I'm on their radar(whatever that means) and I'm hoping they will be so kind and let me give one away on my blog someday....
but until that day comes...I use the freezer paper method.

All you need is freezer paper, fabric paint and a craft knife.
You can see another shirt I made HERE

 So put your printed image under your freezer paper and cut out a stencil using your craft knife....this took me an hour! 
(I'm sure it would have taken me seconds with a Silhouette)
 Place your stencil shiny side down
 and run a warm iron over it.....
 Then you will need to insert all the small pieces...
like the center of the O's, A's R's and P's and iron those in place
 Next, paint!
 I used two different colors and 2 coats of the white...
let it dry and peel off stencil...
 Then you'll need to use the craft knife to remove all the small pieces
 Ta da!!

We are thankful to live another day! 

This post sponsored By:


Check out all the places I party!

You May Also Like:

Related Posts with Thumbnails
Blogging tips